Tag: sourceedit |
(Turns out the Gittish Empire's infamous prison appeared in X as a skill of Hogg's...) Tag: Visual edit |
||
| (8 intermediate revisions by 3 users not shown) | |||
| Line 1: | Line 1: | ||
{{LocationInfo |
{{LocationInfo |
||
|game = Dragon Quest IX |
|game = Dragon Quest IX |
||
| ⚫ | |||
|image = [[File:Gortress.PNG|200px]] |
|image = [[File:Gortress.PNG|200px]] |
||
|caption = In game map of Gortress |
|caption = In game map of Gortress |
||
| ⚫ | |||
| ⚫ | |||
| ⚫ | |||
| ⚫ | |||
| ⚫ | |||
| ⚫ | |||
| ⚫ | |||
| ⚫ | |||
==Story== |
==Story== |
||
{{spoiler|start}} |
{{spoiler|start}} |
||
| − | The story opens with |
+ | The story opens with the [[Hero|Hero/Heroine (Dragon Quest IX)]] next to a Gittish soldier. In front of [[Goreham-Hogg]], he says that the hero is the person who [[Hootingham-Gore]]'s forces are saying is causing trouble. The faithful Lieutenant then says to throw them in the dungeons. The Hero is forced in and told to get rest while he/she can. |
| − | Later, a soldier comes to wake |
+ | Later, a soldier comes to wake the Hero and get him to work. When they go to the bridge, on the end they see a big man. He introduces himself as [[Sterling]] and offers to give the Hero a tour. Sterling walks to the shield field with the Hero and he warns them not to go past. It's explained that the...special people ([[Celestrian]]s) are kept there. He says they'll get a painful shock if they touch it. He tells the Hero to see for themselves. He's surprised when - because of [[Greygnarl]]'s Gittish Seal - they go straight through it. |
| − | He then shows |
+ | He then shows the Hero the gallows (where prisoners are hung), and says they put the people who skive off from work here. Then they are shown the graves and introduced to [[Digby]], who digs the graves for all those who die in the Gortress. Then the Hero is taken to the entrance of the Gortress, where they see they aren't allowed to go in. Finally, they're taken to the main labour area, where people are spinning a wheel (One person asks "What does this even do?", however the Gittish soldier replies that it's mandatory work for the empire, although he doesn't know either). Sterling says that's the whole thing. The screen goes black and says, that after a hard day of work, the hero goes to the cells again. |
| − | In the morning, a person slacking from work yesterday is about to be killed. Sterling decides this is enough, and attacks the soldiers, and told |
+ | In the morning, a person slacking from work yesterday is about to be killed. Sterling decides this is enough, and attacks the soldiers, and told the Hero to turn the shield fields off, so the Hero goes to the watch tower, battles a [[Lethal armour]] and closes it. They turn it off and get out. They go to the other entrance with Sterling, while the other people battle. the hero and Sterling go to free the "special prisoners", which Sterling reveals are Celestrians. |
| − | They go to Goreham-Hogg's lair, where there are 2 treasure chests, the lieutenant and two soldiers. Sterling tells |
+ | They go to Goreham-Hogg's lair, where there are 2 treasure chests, the lieutenant and two soldiers. Sterling tells the Hero to take care of Hogg, and he'll defeat the soldiers. When they defeat him, the Hero and Sterling open the chests, and find the [[Ultimate Key]] and a whistle. The hero uses the key to free the Celestrians and exit the watch tower. The people are still there, supposedly waiting for their leader (They really just needed guidance). |
| − | After this, Barbarus shows up and attacks, and everyone flees. Just then, the Starflight Express comes and hits Barbarus, knocking him away |
+ | After this, [[Barbarus]] shows up and attacks, and everyone flees. Just then, the [[Starflight Express]] comes and hits Barbarus, knocking him away, causing the Dark Dragon to flee. The Hero and Sterling go to it, and [[Stella]] is there, saying she's been looking all over the Protectorate for the Hero and Sterling. Sterling reveals his true identity. He's the captain of the Starflight Express. He takes the Hero back to the [[Observatory]], ending the story of the Gortress. |
| + | {{Spoiler|end}} |
||
==Collectable Resources == |
==Collectable Resources == |
||
{{LocationItem|header|title=[[Dragon Quest IX]]|subtitle=DS}} |
{{LocationItem|header|title=[[Dragon Quest IX]]|subtitle=DS}} |
||
| − | {{LocationItem|entry|item=Recipe: '''"Walk Like a Tank: Heavy Armour and its Uses"'''<br/> |
+ | {{LocationItem|entry|item=Recipe: '''"Walk Like a Tank: Heavy Armour and its Uses"'''<br /> |
| − | {{9i|shield}} Ogre shield, Big boss shield<br/> |
+ | {{9i|shield}} Ogre shield, Big boss shield<br /> |
| − | {{9i|head}} Mythril helm, Minotaur helm<br/> |
+ | {{9i|head}} Mythril helm, Minotaur helm<br /> |
| − | {{9i|body}} Spiked armour<br/> |
+ | {{9i|body}} Spiked armour<br /> |
| − | {{9i|hand}} Sturdy gauntlets, Heavy gauntlets<br/> |
+ | {{9i|hand}} Sturdy gauntlets, Heavy gauntlets<br /> |
{{9i|foot}} Safer shoes, Safest shoes|location=Level 1 - Southwest corner bookshelf}} |
{{9i|foot}} Safer shoes, Safest shoes|location=Level 1 - Southwest corner bookshelf}} |
||
{{LocationItem|entry|item={{9i|item}} [[Ultimate key]]|location=Level 1, guarded by [[Goreham-Hogg]]}} |
{{LocationItem|entry|item={{9i|item}} [[Ultimate key]]|location=Level 1, guarded by [[Goreham-Hogg]]}} |
||
| Line 65: | Line 65: | ||
|drop = {{9i|body}}<br />[[Magic armour]]<br />{{9i|item}}<br />[[Seed of defense]] |
|drop = {{9i|body}}<br />[[Magic armour]]<br />{{9i|item}}<br />[[Seed of defense]] |
||
|note = Event-encountered monster |
|note = Event-encountered monster |
||
| − | |location = |
+ | |location = Gortress - Watchtower - 2F}} |
===Boss Monster=== |
===Boss Monster=== |
||
| Line 86: | Line 86: | ||
Was burnt to a cinder by [[Greygnarl]]'s blazing breath three centuries ago, and brought back as a horrific hog. |
Was burnt to a cinder by [[Greygnarl]]'s blazing breath three centuries ago, and brought back as a horrific hog. |
||
| − | |location = |
+ | |location = Gortress - L1 |
|fire = 75|ice = 125|light = 150|dark = 50|petri = 25|attract = 10|defdown = 75|agidown = 50|mrdown = 75}} |
|fire = 75|ice = 125|light = 150|dark = 50|petri = 25|attract = 10|defdown = 75|agidown = 50|mrdown = 75}} |
||
| Line 93: | Line 93: | ||
::'''Note''': The priest will leave after [[Goreham-Hogg]] was defeated. |
::'''Note''': The priest will leave after [[Goreham-Hogg]] was defeated. |
||
{{LocationAttr|zoom}} |
{{LocationAttr|zoom}} |
||
| − | {{LocationAttr|other|image=Cannot_Zoom_icon.png|text=The [[Hero (Dragon Quest IX)| |
+ | {{LocationAttr|other|image=Cannot_Zoom_icon.png|text=The [[Hero/Heroine (Dragon Quest IX)|Hero/Heroine]] cannot zoom away from here.}} |
::'''Note''': This restriction will lapse after the shield field generator is switched off. |
::'''Note''': This restriction will lapse after the shield field generator is switched off. |
||
| Line 106: | Line 106: | ||
Gortress - B1.PNG|Basement |
Gortress - B1.PNG|Basement |
||
</gallery> |
</gallery> |
||
| + | |||
| + | == Other appearances == |
||
| + | |||
| + | === [[Dragon Quest X]] === |
||
| + | The Gortress itself appears as a skill that Goreham-Hogg can use in his boss fight. When summoned, it appears in the center of the battlefield, and can summon 3 [[Dead resident|Dead residents]] or 3 [[Heavy hood|Heavy hoods]]. |
||
| + | |||
| + | ==Other languages== |
||
| + | {{Languages |
||
| + | |Italian = Casa del dolore |
||
| ⚫ | |||
{{DQIX}} |
{{DQIX}} |
||
[[Category:Dragon Quest IX locations]] |
[[Category:Dragon Quest IX locations]] |
||
| + | [[Category:Dragon Quest X skills]] |
||
| + | [[Category:Dragon Quest X enemy skills]] |
||
Revision as of 18:22, 11 January 2020
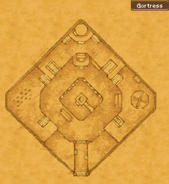
The Gortress is a fortress located in the Gittish Empire in Dragon Quest IX. It is where the empire keeps various prisoners it has captured. It was created by someone, a bird or a dragon, called "Stellestria".
Story
The story opens with the Hero/Heroine (Dragon Quest IX) next to a Gittish soldier. In front of Goreham-Hogg, he says that the hero is the person who Hootingham-Gore's forces are saying is causing trouble. The faithful Lieutenant then says to throw them in the dungeons. The Hero is forced in and told to get rest while he/she can.
Later, a soldier comes to wake the Hero and get him to work. When they go to the bridge, on the end they see a big man. He introduces himself as Sterling and offers to give the Hero a tour. Sterling walks to the shield field with the Hero and he warns them not to go past. It's explained that the...special people (Celestrians) are kept there. He says they'll get a painful shock if they touch it. He tells the Hero to see for themselves. He's surprised when - because of Greygnarl's Gittish Seal - they go straight through it.
He then shows the Hero the gallows (where prisoners are hung), and says they put the people who skive off from work here. Then they are shown the graves and introduced to Digby, who digs the graves for all those who die in the Gortress. Then the Hero is taken to the entrance of the Gortress, where they see they aren't allowed to go in. Finally, they're taken to the main labour area, where people are spinning a wheel (One person asks "What does this even do?", however the Gittish soldier replies that it's mandatory work for the empire, although he doesn't know either). Sterling says that's the whole thing. The screen goes black and says, that after a hard day of work, the hero goes to the cells again.
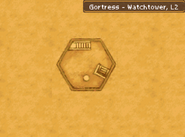
In the morning, a person slacking from work yesterday is about to be killed. Sterling decides this is enough, and attacks the soldiers, and told the Hero to turn the shield fields off, so the Hero goes to the watch tower, battles a Lethal armour and closes it. They turn it off and get out. They go to the other entrance with Sterling, while the other people battle. the hero and Sterling go to free the "special prisoners", which Sterling reveals are Celestrians.
They go to Goreham-Hogg's lair, where there are 2 treasure chests, the lieutenant and two soldiers. Sterling tells the Hero to take care of Hogg, and he'll defeat the soldiers. When they defeat him, the Hero and Sterling open the chests, and find the Ultimate Key and a whistle. The hero uses the key to free the Celestrians and exit the watch tower. The people are still there, supposedly waiting for their leader (They really just needed guidance).
After this, Barbarus shows up and attacks, and everyone flees. Just then, the Starflight Express comes and hits Barbarus, knocking him away, causing the Dark Dragon to flee. The Hero and Sterling go to it, and Stella is there, saying she's been looking all over the Protectorate for the Hero and Sterling. Sterling reveals his true identity. He's the captain of the Starflight Express. He takes the Hero back to the Observatory, ending the story of the Gortress.
Collectable Resources
| Dragon Quest IX (DS) | |
|---|---|
| Item | Location |
| Recipe: "Walk Like a Tank: Heavy Armour and its Uses"
|
Level 1 - Southwest corner bookshelf |
| Level 1, guarded by Goreham-Hogg | |
Inn
There is a blue spot in Gortress Watch Tower that restores the party for free but is only accessible after the Shield Field is turned off.
Merchant
| Merchant | ||
|---|---|---|
| Item | Price | Attributes |
| 8 G | Restore 30 HP | |
| 10 G | Cure poison state | |
| 25 G | Teleport to visited towns/villages | |
| 40 G | Monster repellent | |
| 90 G | Cure confusion state | |
| 500 G | Restore 30 MP | |
| Note: The merchant will leave after Goreham-Hogg was defeated. | ||
Monsters in the Area
Event Monster
| #176 - Lethal armour Material Family | |||||

|
HP | MP | Attack | Defence | Agility |
| 194 | 16 | 158 | 210 | 117 | |
| Exp | Gold | Drop | Magic armour Seed of defense | ||
| 1680 | 164 G | ||||
| Note: Event-encountered monster
| |||||
| Haunts: | |||||
| Gortress - Watchtower - 2F | |||||
Boss Monster
| #270 - Goreham-Hogg Beast Family | ||||||||||||||||||||||||||||||||||||||||||||||||||||||||||||||||||||
| File:GorehamHogg.png | HP | MP | Attack | Defence | Agility | |||||||||||||||||||||||||||||||||||||||||||||||||||||||||||||||
| 3550 | 40 | 196 | 192 | 130 | ||||||||||||||||||||||||||||||||||||||||||||||||||||||||||||||||
| Exp | Gold | Drop | Tough guy tattoo (100%) | |||||||||||||||||||||||||||||||||||||||||||||||||||||||||||||||||
| 17500 | 17500 G | |||||||||||||||||||||||||||||||||||||||||||||||||||||||||||||||||||
| Description: One of the Triumgorate. He sealed those who fell from the skies in cells and sucked out their power.
Was burnt to a cinder by Greygnarl's blazing breath three centuries ago, and brought back as a horrific hog.
| ||||||||||||||||||||||||||||||||||||||||||||||||||||||||||||||||||||
| Encountered at: | ||||||||||||||||||||||||||||||||||||||||||||||||||||||||||||||||||||
| Gortress - L1 | ||||||||||||||||||||||||||||||||||||||||||||||||||||||||||||||||||||
| ||||||||||||||||||||||||||||||||||||||||||||||||||||||||||||||||||||
Location Attributes
- Note: The priest will leave after Goreham-Hogg was defeated.
![]() This location can be reached using the Zoom spell.
This location can be reached using the Zoom spell.
![]() The Hero/Heroine cannot zoom away from here.
The Hero/Heroine cannot zoom away from here.
- Note: This restriction will lapse after the shield field generator is switched off.
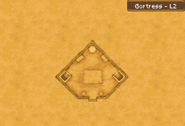
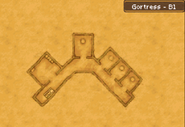
Layout
Other appearances
Dragon Quest X
The Gortress itself appears as a skill that Goreham-Hogg can use in his boss fight. When summoned, it appears in the center of the battlefield, and can summon 3 Dead residents or 3 Heavy hoods.
Other languages
| Other languages | |
| French | Unknown |
| German | Unknown |
| Spanish | Unknown |
| Italian | Casa del dolore |
| Dutch | Unknown |
| Norwegian | Unknown |
| Greek | Unknown |
| Portuguese | Unknown |
| Russian | Unknown |
| Chinese | Unknown |
| Korean | Unknown |
| Dragon Quest IX | |
|---|---|
| Characters | |
| Regions |
|
| Towns, villages and places | |
| Dungeons | |
| Races | |
| Key terms | |
| Treasure maps | |
| Lists | |
| Other | |


